7.15.2009

Black & White Images With Colorful Elements!

First, start with a black and white image, such as this one:

(click for larger image)

Then create a new layer, either by hitting ctrl+shift+n or clicking Layer->Create New Layer.

With this new layer apply colors where you want them. Make sure to change the opacity of the layer so you can see where the color is going:

(click for larger image)

After you have filled in all the colors that you want, play with the modes to achieve the image you like best. I suggest using either overlay or multiply. Also, use multiple layers for different color for more flexibility.

How to change modes:


My finished products:


Brushes, Gradients and Craziness! OH MY!


I haven't written in a while. I've had a serious lack of inspiration for material, but alas, it is here! So I hope you enjoy what I have in store for you today. I saw a question on Yahoo Answers about getting a gradient on a brush and figured this is something a lot of people may want to know. :)

First, select the brush tool. Then select "use color from gradient."

(Click the images for larger versions.)

1.17.2009

Filters

The original intention of my blog was to make it easier for new GIMP users, who may or may not have used P h o t o S h o p, to use the GIMP. I've lost that main track a bit so here is my attempt to make it up to those who may (or may not) feel forgotten.

FILTERS! Now everybody cheer! F-I-L-ters... okay, I never did enjoy cheer-leading, but what I do like is teaching. Now, if you want those PS filters that you are so fond of, check out: http://lifehacker.com/5051650/use-photoshop-filters-in-gimp

I have yet to check it out myself (I know, I know), but I will and when I do, I will update this entry.

1.11.2009

I swear I'll create a decent posting schedule. It'll happen... eventually. Anyhow, Art expressed that he'd like to see a full set of keyboard commands SO here they are. :) Better late than never, right? :D I am putting ALL keyboard commands in this post, but will explain a few and put in red the ones that I feel are worth memorizing. It might seem like a daunting task, but if you use GIMP enough, these commands will become as second nature as CTRL + Z.

I'll try to organize this somewhat...

Toolbox:
  • Rectangle Select Tool - R
  • Ellipse Select Tool - E
  • Free Select Tool - F
  • Fuzzy Select Tool - U
  • Select by Color Tool - Shift + O
  • Scissors Select Tool - I
  • Foreground Select Tool - n/a
  • Path Tool - B
  • Color Picker Tool - O
  • Zoom Tool - Z
  • Measure Tool - Shift + M
  • Move Tool - M
  • Alignment Tool - Q
  • Crop Tool - Shift + C
  • Rotate Tool - Shift + R
  • Scale Tool - Shift + T
  • Shear Tool - Shift + S
  • Perspective Tool - Shift + P
  • Flip Tool - Shift + F
  • Text Tool - T
  • Bucket Fill Tool - Shift + B
  • Blend Tool (Gradient Tool) - L
  • Pencil Tool - N
  • Paintbrush Tool - P
  • Eraser Tool - Shift + E
  • Airbrush Tool - A
  • Ink Tool - K
  • Clone Tool - C [The cloning and healing tools are great when you are doing touch-ups.]
  • Healing Tool - H
  • Perspective Clone Tool - n/a
  • Blur/Sharpen Tool - Shift + U
  • Smudge Tool - S
  • Dodge/ Burn Tool - Shift + D
The Box You Do The Work In: (Some are the same as other Windows commands)
  • New File - CTRL + N
  • Open - CTRL + O
  • Save - CTRL + S
  • Save As - CTRL + SHIFT + S
  • Undo - CTRL + Z
  • Redo - CTRL + Y
  • Cut - CTRL + X
  • Copy - CTRL + C
  • Paste - CTRL + V
  • Select All (in that layer) - CTRL + A
  • Select None - CTRL + Shift + A
  • Select Invert - CTRL + I
  • New Layer - CTRL + Shift + N
  • Duplicate Layer - CTRL + SHIFT + D
I hope these are helpful. First post of the New Year :D
If you like this, comment please!!!

8.09.2008

Simple Shortcuts

Because I tend to reference a command and not explain what it does, I thought it best to create a blog about some shortcuts that, once you master, will make GIMPing (yes I did just turn GIMP into a verb) much easier. :) Now, praise me for my kindness! :D Or don't, whatever man.

I should make t-shirts.

  • New Layer: CTRL+SHIFT+N
  • Select entire canvas: CTRL+A
  • Zoom IN: SHIFT + +
  • Zoom OUT: -
I know it's not much, but those are extremely useful. I'll post the full set of commands if anyone REALLYYYY wants them. :) Enjoy! Go forth and GIMP it up.


7.24.2008

What is Web 2.0?

Web 2.0 is an amazing design concept (apparently because everyone's using it). It's a rather respectable design concept with its sleek buttons (that are all incredibly shiny) and its stripes... oh those stripes. It calls for simplicity with a modern twist, although, for some reason simplicity is always regarded as modern. I've done enough ranting... Now, let me teach you somethin' or another. :D

Should I create a banner... a background?... perhaps... perhaps A BUTTON. A simple button that is rather revolutionary. Why? Because, my friends, it is shiny.

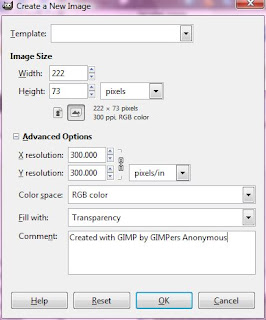
1) File -> New. Once you arrive at the dialog box, change the 'Background Fill' to 'Transparent' and set the size to 222 x 73, as shown:

2) Hit CTRL+A to select the entire box.

3) Then, click Select -> Rounded Rectangle. Its default setting is 50% (that is what I used for the button above). You can increase it or decrease it if you like, but I suggest that you leave it as is.

4) Now you want to add the gradient. I chose b5ffff as the lighter color (double click on a color to edit) and 0071c6 as the darker color. Select the gradient tool and choose the one that matches your color choice by clicking on the box after gradient (Click to enlarge):

5) With the gradient tool selected, click the top of the box (or near it) and drag down towards the bottom.

6)The next step is to create a bevel effect, which I did not know how to do, so I Googled it and found the following page: http://www.novell.com/coolsolutions/feature/17391.html. Then return here once you've created the bevel effect. I was able to follow the tutorial relatively well, which is the reason why I am posting the link.

7) Now, you want to make it look shiny. :D Select the rectangle tool, which is the first tool in the main box and looks like this:Image and video hosting by TinyPic You want to select a small space as shown here:
Image and video hosting by TinyPic


8) Click Select ->Rounded Rectangle.

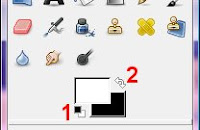
9) Select the paint bucket tool and change your main color to white. You can do so quickly by clicking the small black and white rectangle (1) then click the arrows (2). (Shown to the right)

10) Click on the window with your button. Hit CTRL+ALT+N and hit 'Enter'.

11) Now click (with the paint bucket tool selected) inside the selected area. Then change the transparency to 67%. Adjust the transparency to what you prefer.

Now you can add text or use it however you'd life. :) Enjoy your Web 2.0 button.

5.15.2008

An Apology

I'm really sorry that I haven't posted any tutorials in a while :\

I have quite a bit of work to accomplish before my school year is over!

Once I can start posting again, sometimes within the next two weeks, I plan on posting tutorials on the following topics:
  • Easy Web 2.0 stripes
  • Simple Web 2.0 backgrounds
  • More how-tos with filters and tools
  • And maybe I'll create some myspace tutorials... *shivers*
  • Nifty things to spruce up your images
  • AND MUCH MUCH MORE!
I could throw up slapshod tutorial, but I'd much rather focus on quality and not quantity :D
Please come back soon to check out the new tutorials!